https://nasacademy.com/blog/article/essential-photography-tips

When you think of photography, you think of cameras and lenses – but the quality of results has everything to do with who’s behind them. The way you use your gear paired with the choices you make as a photographer, is what makes the difference between taking a decent shot and capturing powerful photos that speak volumes.
So, if you want to learn how to take photos like a pro, here’s 17 photography tips gathered from some of the best photographers on the internet – if you learn these, you’ll be on your way to being the photo genius you’ve always wanted to be.
As a beginner photographer with a shiny new camera, you might be inclined to jump right in and start taking photos – expecting to get pro-level results right away.
And then, the inevitable happens.
You come home, and all you have is a poorly framed image that’s overexposed with no depth or visual interest. Why?
Because you didn’t take the time to get to know your camera.
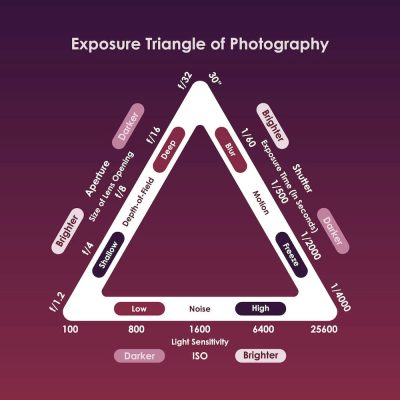
Before you get discouraged, take the time to learn your tools. Set aside a few hours to explore your camera’s features, and make sure you understand photography basics, like the exposure triangle.
Discover what photo setting will yield what result. Know what shutter speed you need to use for capturing movement, and find the proper lenses to use for portraits so you don’t warp your subjects face.
As boring as it might sound, learning fundamental things like photography terms and camera functions is key to capturing high quality shots. It’s photography 101 – and knowing this is how you will finally learn to switch off of “auto” mode, into “manual,” and build your individual technique as a photographer.
When it comes to taking any photography tips, try not to compare yourself to others who might have access to things you don’t. Focus on using what you have. Better yet, find a creative way to use your lack of resources to your advantage.
Finding creative ways to work with what we have can be beneficial in many ways. It can sometimes give us really interesting, new concepts, and it helps build skills of resourcefulness. Maybe you are in a spot where you just can’t get any more light into your frame – lean into that. Go for a silhouette shot instead. Work with the hurdles instead of against them, because what’s important is that you are practicing and you are creating regardless.
Don’t wait until you have all of the fancy equipment or gear to start trying to improve your photography skills. Focus on learning how to take what you see, and tell a story with it. This way, when you do have resources, you’ll know how to tell your story even better.
When you’re taking photographs, it’s crucial to pay attention to your exposure. You can see this through a graph on your camera, called a histogram. This graph will show you the exposure of your shot, or the distribution of light in your camera. It shows you the highlights, and the shadows in your image, and how your camera is picking them up.
If you’re just learning how to use your histogram, here’s the basics:
If the wave on your graph is leaning heavily to the top left, that means your image is most likely underexposed. If it is leaning too high to the right, that means it is probably overexposed. Having the wave of information in the mid-range of the graph, without spiking at the sides, is how you can tell that your image is going to be properly exposed.
Why is this important? Making sure that your shots are not underexposed or overexposed is key so you don’t lose information that cannot be restored when editing – because the truth is: no, you can’t fix everything “in post.”
When you lose too much information in an image, there’s no easy way of recovering it in your editing software. And, if you try, that’s when you start to get a noisy and grainy look in your photos.
It’s best to fix your problem right at the source when taking your picture. This might mean you always keep an extra light handy to lighten up your photo, a sheet of black styrofoam to absorb and block a harsh light, or different lenses that are optimized for shooting in lower light situations.
Regardless, this is one of the most important photography tips that is going to help improve your photography results significantly. Take some time to learn how to avoid overexposing or underexposing your shots while you are shooting, so when you get your photos into the editing room, you’ll have all the information you need.
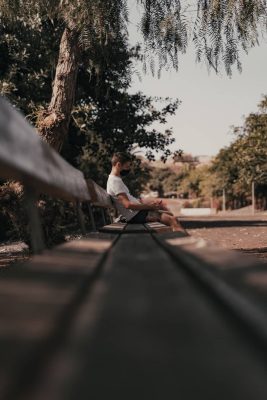
Another one of the top photography tips for beginners out there, is to focus more on the background. Every time you frame up a shot, look at your subject in relation to what’s going on behind it. What is back there? Is everything in the background supporting your image, or taking away from it?
A best practice is to always try and find the white-space, or the empty space in your shot, and frame your subject within it. This will help them stand out, highlight their form, and create a natural frame around the focal point of your image. Jordan Matter described this tip in his photography tips video, and showed how powerful a background can be to your image.
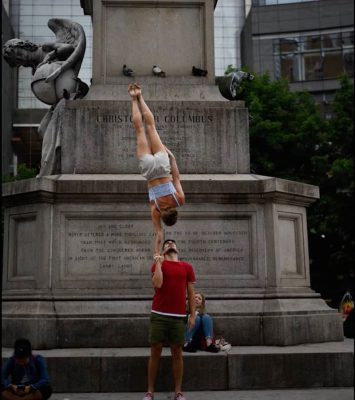
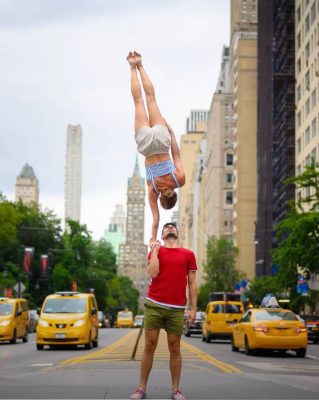
As you can see, the image on the right is significantly more interesting, and the subjects are far more in focus because they are occupying empty space, and the background is supporting them rather than fighting them. On the left, they are blending into the background too much, and are being drowned out by the monument behind them.
Look for backgrounds that don’t have anything largely distracting in them – avoid large monuments, recognizable buildings, or anything that could take the power away from whatever your main subject is. They should be the main event.
Using muted or backgrounds, a shallow depth of field (blurred background), and highlighting subjects using colors that contrast their background can help you achieve this as well.
Before you take a photo, take a minute to really look at your image. Look at the composition. Assess what is in your frame, and ask yourself if whatever is around your focal point, is supporting your photo, or taking away from it.
And if you find something in the frame that isn’t supporting your image – take the extra step to move it.
Often, we can get caught up in wanting to see results, so we rush through the process. But slowing down, and taking a few extra steps to get our frame just right, is what can help transform an amateur-looking photo into a professional-looking masterpiece.
Good photography takes time, effort, and precision. Try not to neglect these necessary, small steps. Slow down, and go the extra mile, it’ll be worth it.
Another important tip to consider when it comes to composition, is the aspect ratio in which you are shooting your photo. The landscape aspect ratio tends to feel more natural, because it’s how we see most things throughout our day to day. On the other hand, using the portrait aspect ratio often brings focus to what’s in the foreground.


Using the right aspect ratio for the story you want to tell can help elevate your photos instantly. It will have a profound impact on how your photo is received, and what is brought to focus for the viewer.
A basic rule of thumb when it comes to composition, and probably one of the most common photography tips, is to use the rule of thirds.
The rule of thirds is a grid system that demonstrates a common, aesthetically pleasing composition of elements in a frame. It divides the image horizontally and vertically into three parts, and guides you to place subjects on the grid lines. In turn, this will help bring visual interest and aesthetic appeal to your image.
Placing your subject off center, onto the right or left vertical line, and having the eye-line intersects with the top horizontal line or bottom horizontal line, is often an aesthetic way of framing your photo.
But while this is a fairly consistent and helpful guide to follow, some professional photographers note that simply using the rule of thirds it isn’t enough to get a good photograph. You can use it and still have a mediocre image. If you follow the rule of thirds, you might leave too much empty space on the opposite side of the frame, making your image feel off-balance.
That’s why it’s important to use your creative eye just as religiously as you do the grid systems – because, sometimes, it’s more reliable to focus on telling your story in whatever visual way you think suits it best. Focus on the contrast, colors, and what else is filling the frame as well as where your subject is placed.
Using guides and rules just because they are “proper” is going to group you in with the masses, and hold you to a standard that restricts your artistic eye. Your individual photo might not work with what is considered “right” in a general sense of the term; for you, getting it right might mean breaking the rules.
If you want to know how to take photos with more visual interest, try using elements in your foreground to frame your subject in the background. Doing this can help fill in your image, especially if there’s too much space around your subject, and gives the illusion of more depth.

One of the great photography tips from a popular YouTuber, Jamie Windsor, is to look at the edges of your photograph. Make sure people aren’t being clipped off in awkward places, things are clean and that everything frames your subject well.
It’s a small detail, but has everything to do with creating an aesthetic composition, where the viewer isn’t distracted by unimportant, oddly jarring things peeking in your frame.
The key to every good photo is good lighting. If you don’t have light, your camera won’t pick up an image – so if there’s one tip you should follow when learning how to take photos like a pro, it’s this:
Always make sure your subject is properly lit.
Follow best lighting practices, and take the extra time to get it right. Don’t be afraid to experiment, get creative, try out different lighting techniques and get more familiar with how light behaves.
Not only is poor lighting a nightmare to fix in post, but lighting depicts the mood for your image. It can really set a tone, and help your photo tell it’s story much more effectively. Much like music accompanies a film to add emotion, lighting is key in giving emotion to your photo.
Don’t shoot with harsh light right directly above your subject, because this can give really unflattering shadows on the face. Play around with some lights inside and see how different positioning and harshness of light can affect your subject, and how achieving the right setup can enhance your images.
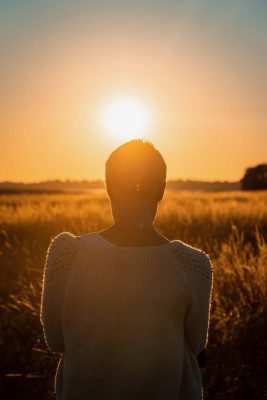
While controlled lights are optimal, shooting outside doesn’t always allow for this. So, be mindful about how the clouds and the sun’s positioning interacts with your photo. Try and shoot when there’s cloud coverage to get nice, natural and diffused light on your subject.
Or, try shooting at the golden hour, when the sun is either rising or setting. Then, you can use the sunlight as a backlight to get some stunning images.
In Parker Walbeck’s photography tips video, he suggests that if you’re forced to shoot when the sun is in the middle of the sky, you should always have a reflector with you, or use a flash to fill it in – but make sure to use one that has a softbox or another type of modifier (a device that helps diffuse and soften the harshness of your light).
Photos are far more interesting when they come from a unique perspective – it’s how you can take anything ordinary, and make it extraordinary.
Peter McKinnon mentioned this tip in one of his videos about filmmaking, but it’s just as applicable to still photography. He says to use the “most obscure, unique angles to tell your story that people don’t usually get to see things from.”
This is what will help you stand out, and make your work more interesting. While you may be inclined to shoot from where you’re standing, or keeping the camera at eye-level, doing this consistently can take away a lot of the visual interest and possible creativity from your photos. Use your imagination and find interesting, unexpected places to put the camera to take your shot.
Always think about perspective and different angles. Try to crouch down, put the camera flat on the ground and try upward angles – this is a common way to get better looking photos across the board. Not to mention, the angles you use tell a lot about your story, and how the viewer will perceive the image.
Here are some different angles and what kind of emotion or impression they give the viewer:
When it comes to perspective and angles, also keep in mind your leading lines – look at where all of the lines in your image are pointing, and frame your subject accordingly to help bring focus to them. Always think about how you can make your shot more interesting when you’re out in the field.
Ask yourself: what is something that you could highlight about this subject from a different angle, to create a unique visual experience?
As when using perspective, don’t be afraid to get creative with your shots and use different props or effects to enhance your pictures. There are so many creative photography ideas that you can incorporate to help you establish your style as a photographer, and tell interesting stories.
Some examples could be shooting through a string of fairy lights to get a blurred light effect, shooting through a sheer curtain or another thin fabric, or shooting through a rain-soaked window to achieve some really interesting effects.
Not only will it help you establish a style of your own when you find techniques that you love, but it also helps you experiment and create freely – and that’s when the best creations often come to life.
Similarly to cutting on motion in filmmaking, the most interesting photos encompass some kind of movement or action that is captured in a single, still frame. Images that are caught candidly and embody a story is a simple way to elevate your work, and add emotion. It’s one of the best ways you can represent an authentic story – and it looks as though you are truly capturing a split second in time.
Life is all about growth and transformation, and creating this feeling of evolution within an image is what makes it stand out. Even with elements that move but are hard to capture with a photo, like cars or a night sky, photographers will use the long-exposure method, and it creates a far more interesting image. This method gives your picture a motion blur effect, to give the illusion of life and movement.

Light shifts, things change, and time passes in the blink of an eye. As a photographer, you have to be observant, notice the moments that you want to capture, and be ready to capture them. When beginning as a photographer, always have a camera on you and, when you see something interesting, don’t think too much about it – just take the shot.
When you’re practicing, it’s best sometimes to forget getting too caught up in technical elements, and just practice taking photos for the sake of taking photos.
Practice seeing the world through the eyes of your camera, and taking a shot when you notice something that peaks your interest. This will help build the habit of noticing, and being quick on your feet. You’ll be able to slowly start seeing things that are different, and it will hone your creative eye. You might even find that in the most random, unexpected moments, you’ll get the best pictures.
Photography is just like any other media. The best photos aren’t just staged to look cool – they will tell a story. They depict relationships between people and they show authentic feelings that someone is experiencing in a real moment in time. Capturing this is how you evoke emotion, and that’s what makes the most amazing photographs.
Practice this creative storytelling technique even in your own personal photos. Instead of taking selfies or posed pictures in front of monuments on your family trips, create movement and action and candid experiences to capture. Think deeper into the meaning and the essence of the experience, and how you can capture that with your photo.
After all, it’s far nicer to look back on who you were with, and the emotions you felt surrounding a place, rather than simply seeing that you were there.
Because as human beings, we don’t just remember how things looked; we remember how things felt – we remember experiences. Try and let your photography capture those moments and those experiences. Next time you’re out shooting, don’t think about what photo you are going to take that day, how it will look, and how many likes it will get on Instagram – but ask yourself: what is the story that you are going to capture at this moment in time?

One of the most highly encouraged photography tips out there is to be careful of over-editing. While you may be eager to make your image as beautiful as it can be, it’s easy to go a little overboard without knowing it. We might try to highlight elements of an image that actually end up taking away from the story and emotion behind it.
A great way to counteract your natural instinct to plaster your images with too many filters and effects, is to mock up a mood board for yourself. Every time you edit a photo, refer back to this mood board to see if you’re matching your initial vision for your work.
Or, if you’ve gotten consumed in excitement about your amazing photo and went a little wild with the effects, make your draft edits, and then walk away from it for a while. Then, come back with fresh eyes, and finalize it. You might find that you cool it with the colors and contrast once your excitement has worn off a bit.
If you want to learn how to take photos like a pro, remember that it’s going to be a process. It’s going to take a lot of trial and failure, which is why you need to allow yourself to experiment, and regularly reflect on how far you’ve come.
Practice and try things out – and as you go through your photography journey, track your progress. Every photographer will tell you that the best way to get good at photos is through practice.
By learning how things work through personal practice, learning from your mistakes and reflecting on how far you’ve come in your journey, you will be able to build the skills, patience and expertise to always keep learning and improving – because as an artist, the learning will never end.
5 years ago, the world had 5 million social media creators. Today, that number is over 50 million.
Welcome to the Creator Revolution. Now, for the first time ever, you can actually get a job doing what you love.
You can be a social media manager, a digital marketer on TikTok, or a community manager on Discord. Not only are these the world’s newest jobs, they are guaranteed to be in-demand in future. And they are way more fun than your average 9 to 5, and pay even better! But there hasn’t been one single place to learn all these skills. Until now.
This is the Creator Accelerator Program. We designed this program to help you skyrocket your career as a creator. From learning how to grow on social media platforms, to building a network and accessing job opportunities with the world’s top brands – this immersive program will transform your career in just 5 months.

Become a professional photograph

By Admin Nas Academy
WE EMPOWER CREATORS.


